java.util.concurrent.atomic包中对基本类型进行原子操作的类有:AtomicInteger、AtomicBoolean、AtomicLong。
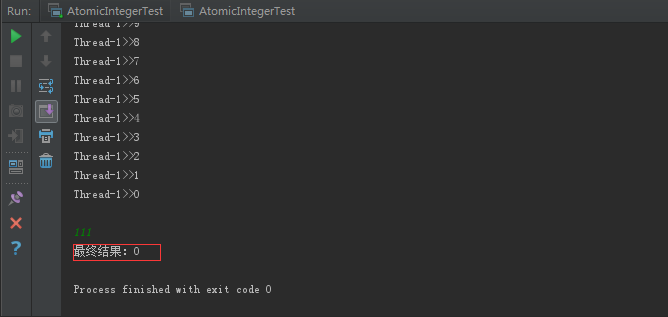
下面通过一个测试程序来验证一下AtomicInteger真的实现了原子操作
public class AtomicIntegerTest { public static AtomicInteger count=new AtomicInteger(0); public static void main(String[] args) throws IOException { /*一个线程递增10000次*/ new Thread() { public void run() { for (int i = 0; i < 10000; i++) { System.out.println(this.getName() + ">>" + count.addAndGet(1)); } } }.start(); /* * 两个线程分别递减5000次 */ new Thread() { public void run() { for (int i = 0; i < 5000; i++) { System.out.println(this.getName() + ">>" + count.addAndGet(-1)); } } }.start(); new Thread() { public void run() { for (int i = 0; i < 5000; i++) { System.out.println(this.getName() + ">>" + count.addAndGet(-1)); } } }.start(); System.in.read(); System.out.println("最终结果:"+count); }} 按照我们的预期如果最终结果是0,那么就可以说明确实实现了原子操作。
通过查看源码发现update操作最终都是通过调用compareAndSet方法,也就是通过Unsafe调用C程序执行CPU命令。
/** * Atomically sets to the given value and returns the old value. * * @param newValue the new value * @return the previous value */ public final int getAndSet(int newValue) { for (;;) { int current = get(); if (compareAndSet(current, newValue)) return current; } } /** * Atomically increments by one the current value. * * @return the previous value */ public final int getAndIncrement() { for (;;) { int current = get(); int next = current + 1; if (compareAndSet(current, next)) return current; } } public final boolean compareAndSet(int expect, int update) { return unsafe.compareAndSwapInt(this, valueOffset, expect, update);} 另外,这种自旋的方式保证操作成功的方式在竞争激烈的情况对CPU资源消耗比较大。
因为基本类型的原子类都比较近简单,实现方式也比较接近,在这就不细说了。
AtomicBoolean 最终也是调用了unsafe.compareAndSwapInt方法,
AtomicLong最终调用了unsafe.compareAndSwapLong方法,AtomicLong会多一个判断虚拟机是否支持long型无锁CompareAndSet,不过好像也没用它做任何事,意义何在呢???
/** * Records whether the underlying JVM supports lockless * compareAndSwap for longs. While the Unsafe.compareAndSwapLong * method works in either case, some constructions should be * handled at Java level to avoid locking user-visible locks. */ static final boolean VM_SUPPORTS_LONG_CAS = VMSupportsCS8(); /** * Returns whether underlying JVM supports lockless CompareAndSet * for longs. Called only once and cached in VM_SUPPORTS_LONG_CAS. */ private static native boolean VMSupportsCS8();
延伸知识点
public class AtomicInteger extends Number implements java.io.Serializable { private static final long serialVersionUID = 6214790243416807050L; // setup to use Unsafe.compareAndSwapInt for updates private static final Unsafe unsafe = Unsafe.getUnsafe();//Unsafe仅供JDK内部调用,我们写的程序不能直接调用 private static final long valueOffset;//value相对对象地址的偏移量 static { try { valueOffset = unsafe.objectFieldOffset (AtomicInteger.class.getDeclaredField("value")); } catch (Exception ex) { throw new Error(ex); } } private volatile int value;//用volatile修饰,value值被某个线程修改后其他线程可以读到最新值 AtomicInteger有个属性valueOffset,并且通过静态代码块来初始化。valueOffet就是属性value相对AtomicInteger对象起始地址的偏移量,比如AtomicInteger对象实例化以后地址是1,valueOffet=N,那么value属性的起始地址就是1+N,做compareAndSwap的时候就可以直接定位到value的地址。
具体原理还要从Java对象内存布局说起:
在HotSpot虚拟机中,对象的内存布局可以分为三部分:对象头(Header)、 实例数据(Instance Data)和对齐填充(Padding)。
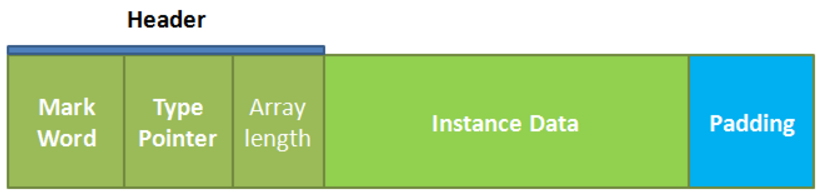
- 对象头
- 存储对象自身的运行时数据:Mark Word(在32bit和64bit虚拟机上长度分别为32bit和64bit),包含如下信息:
- 对象hashCode
- 对象GC分代年龄
- 锁状态标志(轻量级锁、重量级锁)
- 线程持有的锁(轻量级锁、重量级锁)
- 偏向锁相关:偏向锁、自旋锁、轻量级锁以及其他的一些锁优化策略是JDK1.6加入的
- 类型指针:对象指向类元数据的指针(32bit-->32bit,64bit-->64bit(未开启压缩指针),32bit(开启压缩指针))
-
JVM通过这个指针来确定这个对象是哪个类的实例(根据对象确定其Class的指针)
-
- 存储对象自身的运行时数据:Mark Word(在32bit和64bit虚拟机上长度分别为32bit和64bit),包含如下信息:
- 实例数据:对象真正存储的有效信息
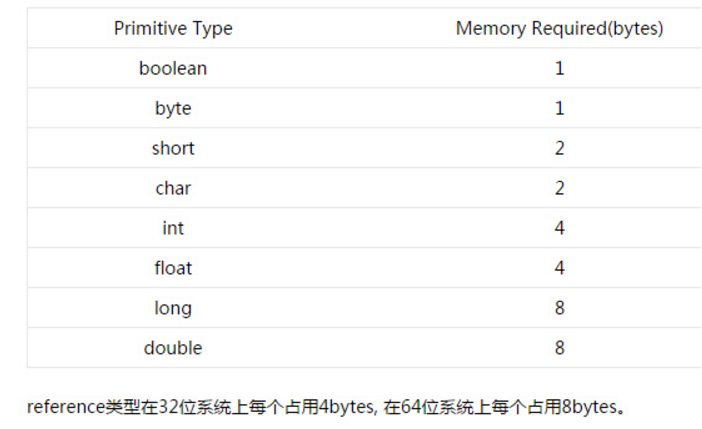
- 对齐填充
- JVM要求对象的大小必须是8的整数倍,若不是,需要补位对齐